Seeing the persistent mouse loading icon (the spinning blue circle) can be incredibly frustrating, as it often indicates something is wrong with your system. Fortunately, there are several methods you can try to resolve this mouse loading issue.
Table of Contents
How to fix the Mouse loading Icon Won’t go Away Issue?
This article will guide you through various troubleshooting steps, including restarting Windows Explorer, ending the spooler process, disabling the fingerprint device, updating the mouse driver, booting into Safe Mode, performing a clean boot, and running an SFC scan.
1. Restart Windows Explorer
Windows Explorer manages the user interface, including the desktop, taskbar, and file management. Sometimes, a minor glitch in Windows Explorer can cause the mouse loading icon to persist.
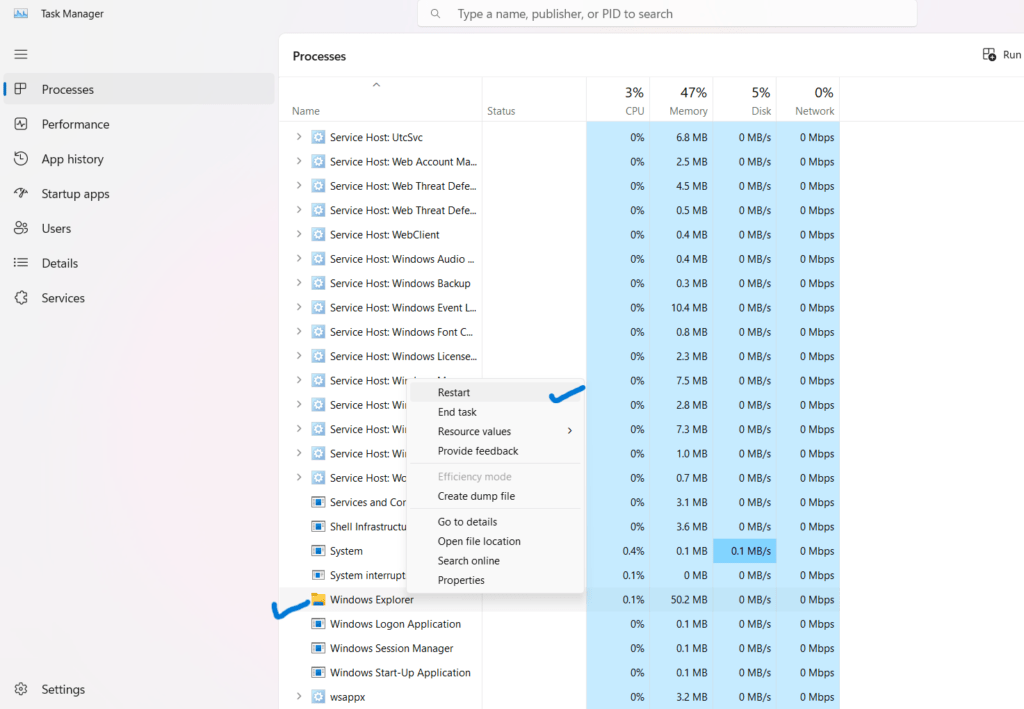
- To access the task manager, press Shift+Ctrl+Esc, or Right-click on the taskbar and select “Task Manager.”
- In the Task Manager window, navigate to the “Processes” tab.
- Select Windows Explorer.
- Right-click on Windows Explorer and select the Restart option.
2. End the Spooler process
The spooler process is responsible for managing print jobs. Occasionally, issues with the print spooler can cause the mouse loading icon to stay visible.
- Press
Ctrl + Shift + Escto open the Task Manager. - Go to the
Processestab and look forSpooler SubSystem App. - Select and click
End Task.

3. Disable the fingerprint device
Fingerprint devices, often found in laptops, can sometimes cause conflicts that result in the persistent mouse loading icon.
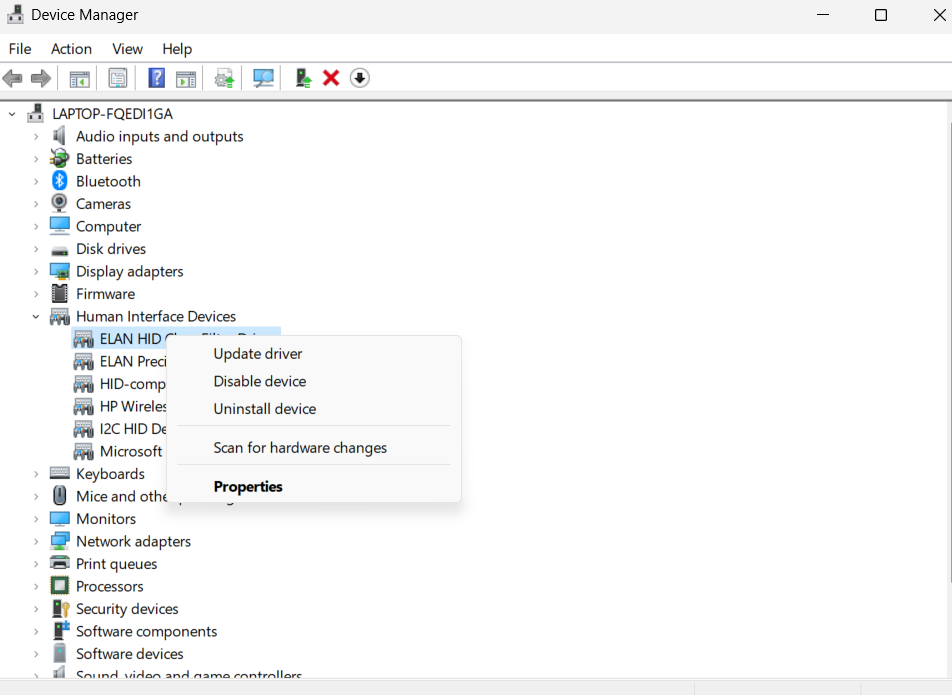
- Press
Win + Xand selectDevice Manager. - Expand the
Human Interface Devicessection. - Right-click on your fingerprint device and select
Disable.
4. Update the mouse driver
Outdated or corrupt mouse drivers can cause various issues, including the persistent mouse loading icon.
- Press
Win + Xand selectDevice Manager. - Expand the
Mice and other pointing devicessection. - Right-click on your mouse and select
Update driver. - Choose
Search automatically for updated driver software.

5. Boot into Safe Mode
Booting into Safe Mode can help determine if third-party software or drivers are causing the mouse loading problem.
- Press Win + I together to open Windows Settings.
- Choose System from the left pane and head over to the Recovery section on the right side of the window.

- Click on the Restart Now button associated with Advanced Startup.
- Hit Restart now again.

- Head over to Troubleshoot > Advanced options in the next window.
- Choose Startup Settings and then click on Restart.
- In the following window, press 4 to launch Safe Mode.

- Once the PC boots into Safe Mode successfully, try checking if this fixes the problem.
- Once in Safe Mode, you can perform various troubleshooting tasks, such as running a system scan for errors, uninstalling recently installed software, or updating drivers.
6. Perform Clean Boot
A clean boot helps eliminate software conflicts by starting Windows with a minimal set of drivers and startup programs.
- Press the Windows key + R to open the Run dialog box.
- Type “msconfig” and press Enter to open the System Configuration.
- In the System Configuration window, go to the “Services” tab.
- Check the box that says “Hide all Microsoft services.“
- Click the “Disable all” button.

- Next, go to the “Startup” tab and click on “Open Task Manager.“
- In the Task Manager window, disable all the startup programs by right-clicking on each entry and selecting “Disable.”

- Close the Task Manager and go back to the System Configuration window.
- Click “OK” and then restart your computer.
7. Run SFC Scan
The System File Checker (SFC) tool can scan for and repair corrupted system files that might be causing the persistent mouse loading icon.
- Open Start.
- Search for Command Prompt, right-click the top result, and select the Run as administrator option.
- Type the following commands to perform a quick fix on your PC: sfc /scannow
- Be patient and wait till the scanning is complete.

8. Disable third-party Explorer add-ons
- Press
Windows + Rto open the Run dialog box. - Type
regeditand press Enter to open the Registry Editor. - Navigate to the following path:
HKEY_LOCAL_MACHINE\SOFTWARE\Microsoft\Windows\CurrentVersion\Shell Extensions\Approved - Look for entries that belong to third-party add-ons.
- Right-click on them and select
Delete. - Close the Registry Editor and restart your computer.

9. Change your mouse cursor scheme
- Press
Windows + Ito open the Settings app. - Go to
Bluetooth and Devices. - Select
Mousefrom the left sidebar. - Click on
Additional mouse options. - In the Mouse Properties window, go to the
Pointerstab. - Under
Scheme, select the cursor scheme you prefer from the drop-down menu. - Click
Apply, thenOK.

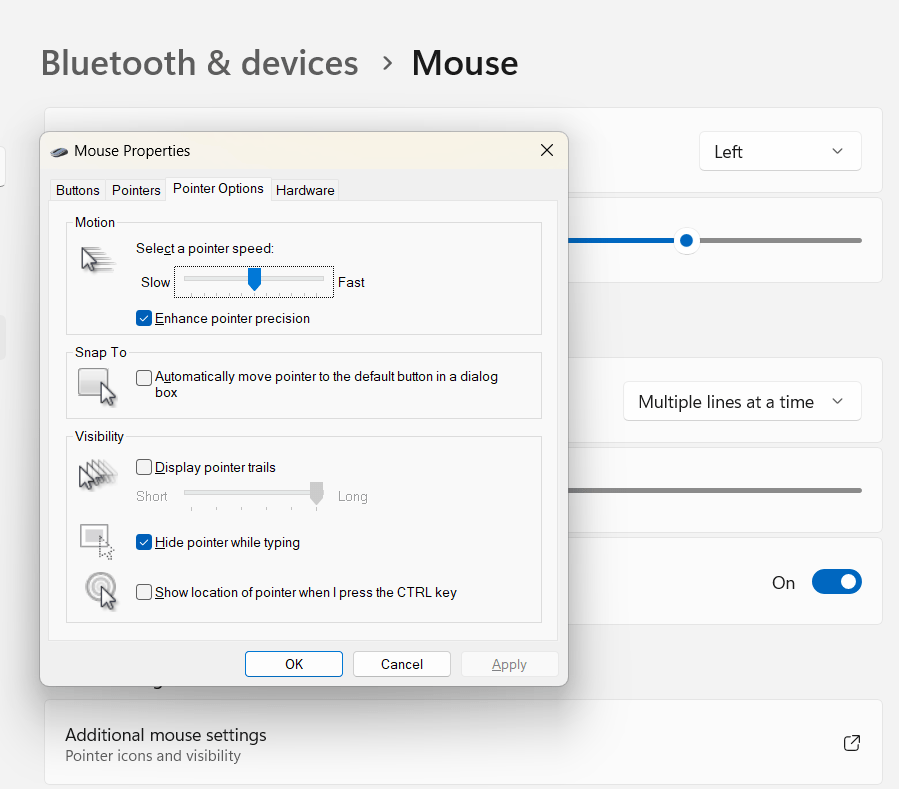
10. Disable Mouse Pointer Location
Disabling Mouse Pointer Location appears to be a workaround for the Windows mouse loading issue, per a user post on the Microsoft forum.
- Press
Windows + Ito open the Settings app. - Go to
Bluetooth and Devices. - Select
Mousefrom the left sidebar. - Click on
Additional mouse options. - In the Mouse Properties window, go to the
Pointer Optionstab. - Uncheck the box that says
Show location of pointer when I press the CTRL key. - Click
Apply, thenOK.
11. Change the Mouse Pointer
Many users claimed that by adjusting the mouse pointer settings, they could remove the mouse loading in Windows 10.
- Press
Windows + Ito open the Settings app. - Go to
Bluetooth and Devices. - Select
Mousefrom the left sidebar. - Click on
Additional mouse options. - In the Mouse Properties window, go to the
Pointerstab. - Select the pointer you want to change, then click
Browse. - Choose a new pointer file from the list or your files.
- Click
Open, thenApply, andOK.

12. Repair MS Office Installation
You might experience the Windows mouse loading cursor issue if your Microsoft Office installation becomes corrupted. You can resolve this by fixing the Office installation.
- Press
Windows + Ito open the Settings app. - Go to
Apps. - Find and select
Microsoft Officefrom the list. - Click on
Modify.

- Choose
Quick Repairfor a fast, less extensive repair, orOnline Repairfor a thorough fix.

- Follow the on-screen instructions to complete the repair process.
13. Check File System Errors
The mouse loading error can also be effectively fixed by running CHKDSK on your computer’s hard disk to check for potential issues that might be related to the error.
- Open Start.
- Search for Command Prompt, right-click the top result, and select the Run as administrator option.
- Type “chkdsk /f C:” and press Enter (replace “C:” with the letter of the drive you want to check if it is not your system drive.)
- Press “Y” when prompted to schedule the disk check on the next restart.
- Restart your PC.

- The disk check will run automatically on startup and check for any issues with the disk.
- If any issues are found, they will be fixed automatically.
14. Uninstall ASUS Smart Gesture
- Press
Windows + Ito open the Settings app. - Go to
Apps. - Find
ASUS Smart Gesturein the list. - Click on it and select
Uninstall. - Follow the on-screen instructions to complete the uninstallation.
15. Remove Asus Framework (For Asus Laptops only)
- Press
Windows + Ito open the Settings app. - Go to
Apps. - Find
Asus Frameworkin the list. - Click on it and select
Uninstall. - Follow the on-screen instructions to complete the uninstallation.
16. Set Time and date
Ensure that your system’s date and time settings are correct. Incorrect date and time settings can sometimes cause “mouse loading” issues with the Microsoft Store.
- Press
Windows + Ito open the Settings app. - Go to
Time & language. - Select
Date & timefrom the left sidebar. - Toggle on
Set time automaticallyandSet time zone automatically, or manually adjust the settings. - Click
Sync nowto update the time.

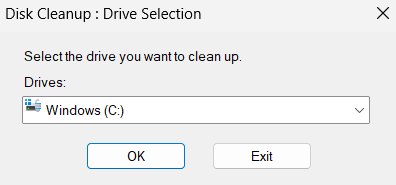
17. Disk Cleanup
Clearing the File Explorer crashes history can help in case it’s causing conflicts. When this data becomes old or faulty, it can cause mouse loading issues, including the one detailed here.
- In the search box, type Disk Cleanup by pressing Win + S.
- Choose the most appropriate option to initiate Disk Cleanup.
- From the drop-down list, select the desired drive.
- To delete files, choose them from the Files to delete column and click OK.
18. Scan for Antivirus
Malware and viruses can cause system slowdowns. Conduct a complete computer scan using an authorized antivirus or antimalware tool to check for issues.
- Type “Windows Security” in the Windows search bar and select “Windows Security” from the results.
- In the Windows Security window, click on “Virus & Threat Protection.“
- Under “Current threats,” click on “Quick Scan” to perform a basic scan.
- For a more comprehensive scan, you can choose “Full Scan.“
- Follow the on-screen instructions to complete the scan.
- If any threats are detected, Windows Defender will provide options to remove or quarantine them.

A persistent mouse loading icon can be a symptom of various underlying issues, from minor glitches in Windows Explorer to more serious problems with system files or hardware drivers.


