Table of Contents
Fixing Install Error 0x80070643
Encountering the install error 0x80070643 on Windows 10 can be frustrating, especially when trying to update your system or install essential software. This error is usually related to Windows Update or .NET Framework issues. Here’s a detailed guide to help you resolve this error.
1. Retry the installation
Sometimes, simply retrying the installation can resolve the Install Error 0x80070643 issue. Click on “Retry” to attempt the installation again.
2. Restart your computer
A simple restart can often fix many software issues, including Install Error 0x80070643. Restart your computer and try the installation again.
3. Pause other Downloads
Ensure that no other downloads or updates are running in the background, which can interfere with the installation process.
4. Check your internet connection
A stable internet connection is crucial for downloading and installing updates. Make sure your internet connection is stable and functioning properly.
5. Close all other programs that are currently running
Close all unnecessary programs and applications running on your computer to free up resources and avoid conflicts during installation.
6. Windows Update Troubleshooter
Windows has a built-in troubleshooter that can help identify and fix Install Error 0x80070643 issues with Windows Update.
- Open Settings by searching on Windows Search for Settings.
- Choose Troubleshoot under the System tab.
- Click on Other troubleshooters.
- Click on Run next to Windows Update.
- The update troubleshooter will pop up and look for any available issues.
- Follow the on-screen instructions to remove the detected problems from the system.

7. Reset Windows Security
Resetting Windows Security can sometimes resolve the Install Error 0x80070643.
- Right-click on the Start button and select Apps and Features.
- Scroll down and locate the Windows Security.
- Click on Windows Security, then select Advanced options.
- Scroll down and click on the Reset button.
- Confirm the action by clicking Reset again. After resetting the app, relaunch it to see if the issue persists.

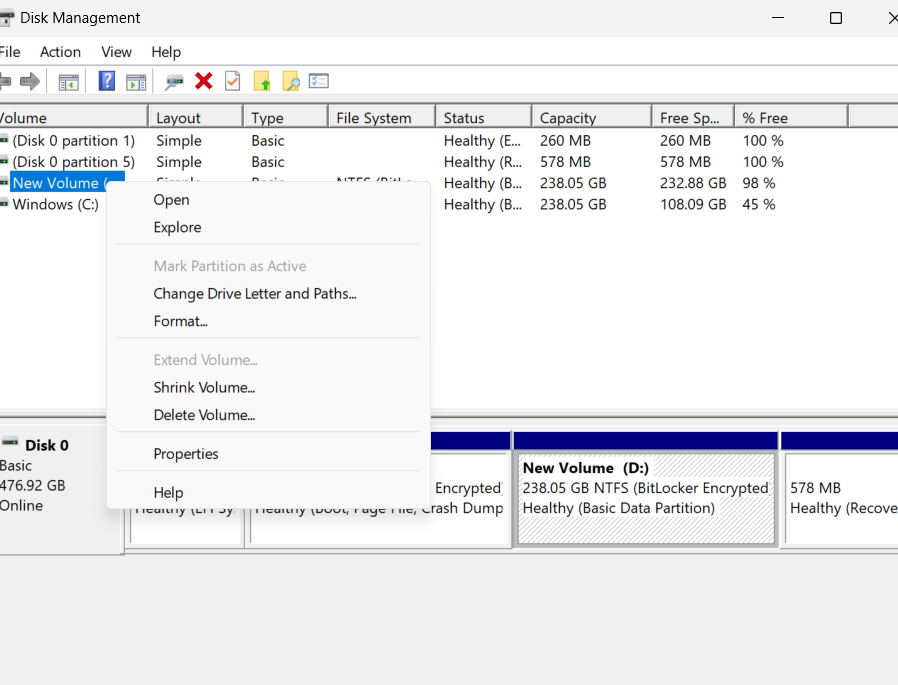
8. Resize the recovery partition
If your recovery partition is full, resizing it might help.
- Press Win + X and select Disk Management.
- Locate the recovery partition, right-click on it, and select Extend Volume.
- Follow the wizard to resize the partition.

9. Clear Windows Update cache
Clearing the Windows Update cache can resolve Install Error 0x80070643 issues.
- Stop Background Intelligent Transfer Service and Windows Update in the Services menu.
- Navigate to C:\Windows\SoftwareDistribution\Download in File Explorer and delete its contents.
10. Run DISM and SFC commands
A System File Check (SFC) scan can help identify and repair corrupted system files that may be causing “Install Error 0x80070643” issues. The DISM is another tool you can try out; while it’s not exactly like SFC, it functions almost identically.
- Open Start.
- Search for Command Prompt, right-click the top result, and select the Run as administrator option.
- Type the following commands to perform a quick fix on your PC.
DISM /Online /Cleanup-Image /CheckHealth
DISM /Online /Cleanup-Image /ScanHealth
DISM /Online /Cleanup-Image /RestoreHealth
SFC /scannow- The DISM and SFC commands are used for scanning your PC and automatically installing broken or missing Windows files on your PC.
- Type the following commands to perform a quick fix on your PC: sfc /scannow
- Be patient and wait till the scanning is complete.

11. Run CHKDSK
CHKDSK can help fix file system errors that might be causing the Install Error 0x80070643.
- Open Start.
- Search for Command Prompt, right-click the top result, and select the Run as administrator option.
- Type “chkdsk /f C:” and press Enter (replace “C:” with the letter of the drive you want to check if it is not your system drive.)
- Press “Y” when prompted to schedule the disk check on the next restart.
- Restart your PC.

- The disk check will run automatically on startup and check for any issues with the disk.
- If any issues are found, they will be fixed automatically.
12. Repair your Windows 10 installation
Repairing your Windows installation can resolve Install Error 0x80070643 issues.
- Insert your Windows 10 installation media or create a bootable USB drive.
- Boot from the installation media.
- Select “Repair your computer” and follow the on-screen instructions.
13. Boot into Safe Mode
Booting into Safe Mode can help Install Error 0x80070643 issues caused by third-party software.
- Press Win + I together to open Windows Settings.
- Choose System from the left pane and head over to the Recovery section on the right side of the window.

- Click on the Restart Now button associated with Advanced Startup.
- Hit Restart now again.

- Head over to Troubleshoot > Advanced options in the next window.
- Choose Startup Settings and then click on Restart.
- In the following window, press 4 to launch Safe Mode.

- Once the PC boots into Safe Mode successfully, try checking if this fixes the problem.
- Once in Safe Mode, you can perform various troubleshooting tasks, such as running a system scan for errors, uninstalling recently installed software, or updating drivers.
14. Restart Windows Installer
Restarting the Windows Installer service can help fix Install Error 0x80070643 issues.
- Press Win + R, type
services.msc, and press Enter. - Locate and right-click on Windows Installer, then select Restart.

15. Update a graphics driver
Outdated graphics drivers can sometimes cause Install Error 0x80070643 errors.
- Press the Windows key + R to open the Run box.
- Type devmgmt.msc and click OK to open Device Manager.
- In the Device Manager window, expand the Display adapters section. It will list all the integrated and dedicated graphics drivers installed on your computer. Do the following for all of the drivers.

- Right-click on the display driver and choose Uninstall Driver. Uncheck the “Delete the driver software for this device.” option in the pop-up if it shows up.
- Go to the top menu in Device Manager and under the Action tab, select Scan for hardware changes.
- The driver should appear back in the Display adapters list. If it does not, then restart your PC and it will appear back.
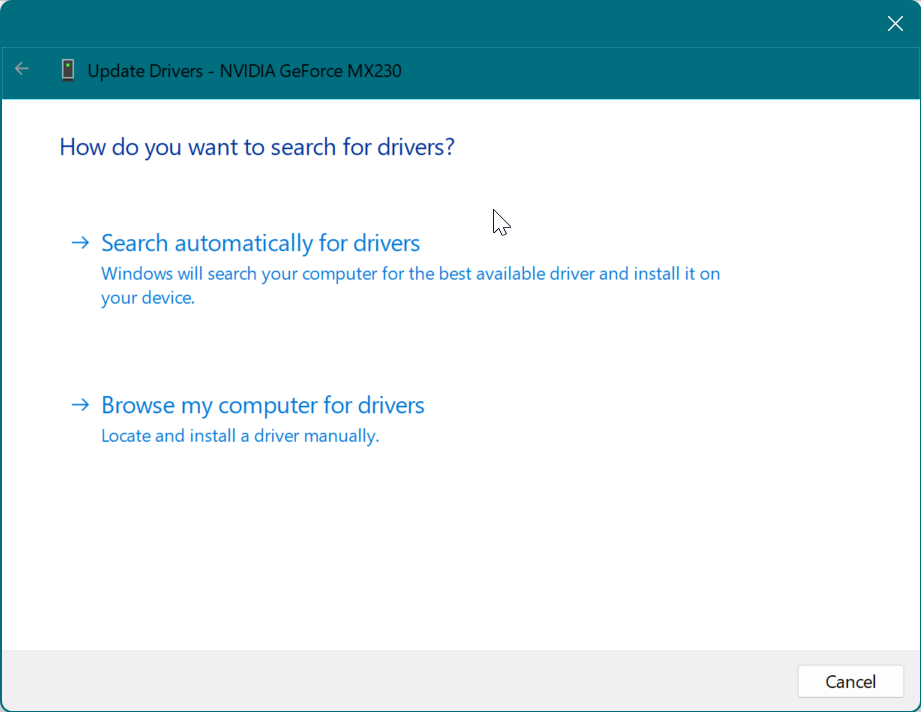
- Right-click on the display driver again and choose Update Driver.
- Select Search automatically for drivers. Windows will scan for available driver updates and download them.
- Restart your PC to apply the changes.

- If it didn’t work, again right-click on the display driver and choose Update Driver but this time select Browse my computer for driver software.
- Then select Let me pick from a list of available drivers on my computer.
- Select the driver you want to install, generally, it is the pre-selected top option in the list and click Next.
- Restart your PC to apply the changes.

- If even that doesn’t work, you can try going to your laptop or graphic card manufacturer’s official website and downloading the latest drivers for your specific model from there and then simply install the drivers and restart your PC to apply the changes.
- The following are links to GPU manufacturer driver download websites:
16. Uninstall updates
If you are experiencing issues after installing an update, consider checking for solutions or waiting for Microsoft to release a fix for the brightness control function keys not working problem.
- Go to the Windows Settings.
- Click “Windows Update” from the left-hand side menu.
- Then go to the Update history > Uninstall Updates.

17. Install the latest .NET Framework
The .NET Framework is essential for many applications and updates.
- Go to the official Microsoft .NET download page.
- Download and install the latest version.
- Restart your computer.
18. Run the .NET Framework Repair Tool
Microsoft provides a repair tool for the .NET Framework that can fix common issues.
- Download the .NET Framework Repair Tool from the Microsoft website.
- Run the tool and follow the prompts.
19. Rename the SoftwareDistribution folder
The Software Distribution folder stores temporary files related to Windows updates. Corrupted files in this folder can lead to “Install Error 0x80070643” issues. Clearing this folder may resolve the problem.
- Open Command Prompt as an administrator.
- Run the following commands:
- net stop wuauserv
- ren C:\Windows\SoftwareDistribution SoftwareDistribution.old
- net start wuauserv
20. Temporarily disable your antivirus software
Sometimes, antivirus software can interfere with installations. Temporarily disable it and try the installation again.
- Press the Win key to open the Start Menu.
- Type Windows Security and press Enter.
- Choose Firewall & network protection from the left panel.
- Choose the Private network option.
- Disable the toggle under Microsoft Defender Firewall.
- If UAC pops up, click on Yes.
- Check if the problem continues. If yes, just enable the Firewall again.

21. Clear Contents in the Catroot2 Folder
Clearing the Catroot2 folder can help with Windows Update issues.
- Open Command Prompt as an administrator.
- Run the following commands:
- net stop cryptsvc
- del %systemroot%\System32\catroot2
- net start cryptsvc
22. Manually Update Windows Defender
Updating Windows Defender manually can help if the Install Error 0x80070643 is related to Windows Defender updates.
- Go to Settings > Update & Security > Windows Security.
- Click on “Virus & threat protection” and then “Check for updates“.

23. Download and install the latest update manually
If automatic updates fail, you can download and install the update manually from the Microsoft Update Catalog.
- Visit the Microsoft Update Catalog website.
- Search for the update by its KB number and download the appropriate version for your system.
- Run the downloaded file to install the update.
24. Perform Clean Boot
By doing a clean boot, the Install Error 0x80070643 problem in Windows 11 can be fixed. By doing this, you will be able to identify precisely which service is responsible for your computer’s Install Error 0x80070643 problem.
- Press the Windows key + R to open the Run dialog box.
- Type “msconfig” and press Enter to open the System Configuration.
- In the System Configuration window, go to the “Services” tab.
- Check the box that says “Hide all Microsoft services.“
- Click the “Disable all” button.

- Next, go to the “Startup” tab and click on “Open Task Manager.“
- In the Task Manager window, disable all the startup programs by right-clicking on each entry and selecting “Disable.”

- Close the Task Manager and go back to the System Configuration window.
- Click “OK” and then restart your computer.


