Table of Contents
Fix: Windows 11 Screensaver Not Working
Do you find yourself staring at a static screen on your Windows computer, waiting for the screensaver to kick in, but it never does? If your Windows screensaver not working, you’re not alone. Many Windows users have experienced this screensaver not working frustrating issue, and it can be a real nuisance. But fear not, because in this article, we’ll explore the common reasons why your screensaver not working and provide you with step-by-step solutions to get it back on track.
Why Windows Screensaver Not Working
Before we delve into the solutions, it’s essential to understand why your Windows screensaver may have stopped working. Several factors could be responsible for this screensaver not working issue, and identifying the root cause is the first step in resolving it. Here are some of the common reasons why your screensaver not working:
- Mouse or Keyboard Activity: Windows screensavers are designed to activate when there’s no mouse or keyboard activity for a specified period. If your computer detects any input from the mouse or keyboard, the screensaver won’t activate.
- Software Conflicts: Third-party software or applications running in the background can interfere with the screensaver’s operation. Sometimes, these applications prevent the screensaver from starting.
- Driver Issues: Outdated or corrupted display drivers can cause problems with the screensaver. If your drivers are not up to date, it can lead to screensaver issues.
- Power Settings: Your computer’s power settings can influence when the screensaver activates. If these settings are not configured correctly, it can affect the screensaver’s behavior.
- Screen Saver Settings: Incorrect screensaver settings, such as an inappropriate wait time or a specific screensaver selected, can lead to the screensaver not working as expected.
How to Fix a Screensaver Not Working
Now that we have a better understanding of the potential causes, let’s dive into the solutions to resolve the screensaver not working issue.
1. Verify Screen Saver Settings
Verify the settings for the screensaver. Updates for Windows can fix screensaver not working issues, but they can also alter personalized settings. Verify that your screensaver is activated if it’s not functioning properly.
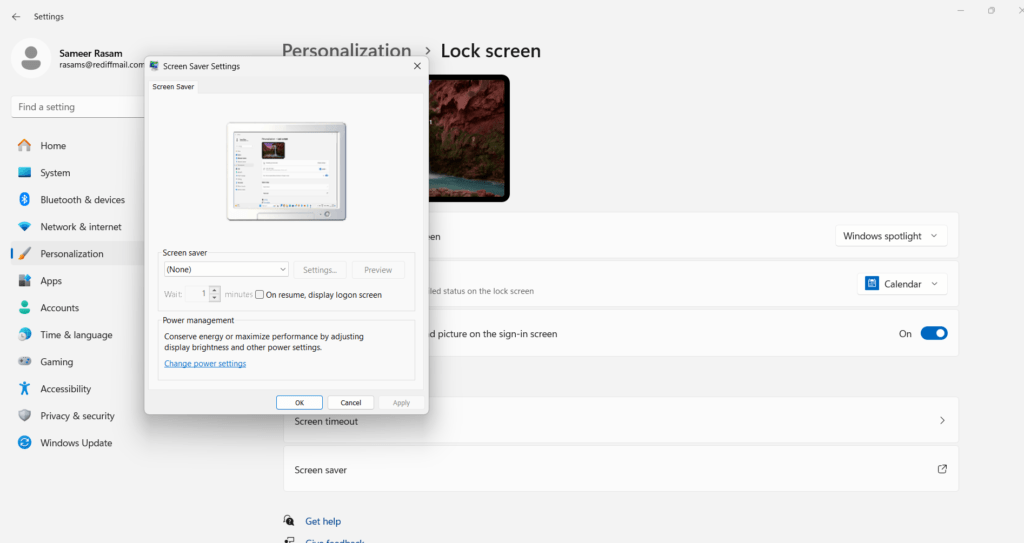
- Right-click on the desktop and select “Personalize.“
- Click on “Lock screen” on the left pane.
- Scroll down to the “Screen saver settings” link and click on it.
- Choose a screensaver from the drop-down menu and set the desired wait time. Click “Apply” and then “OK.”
2. Check Power Settings
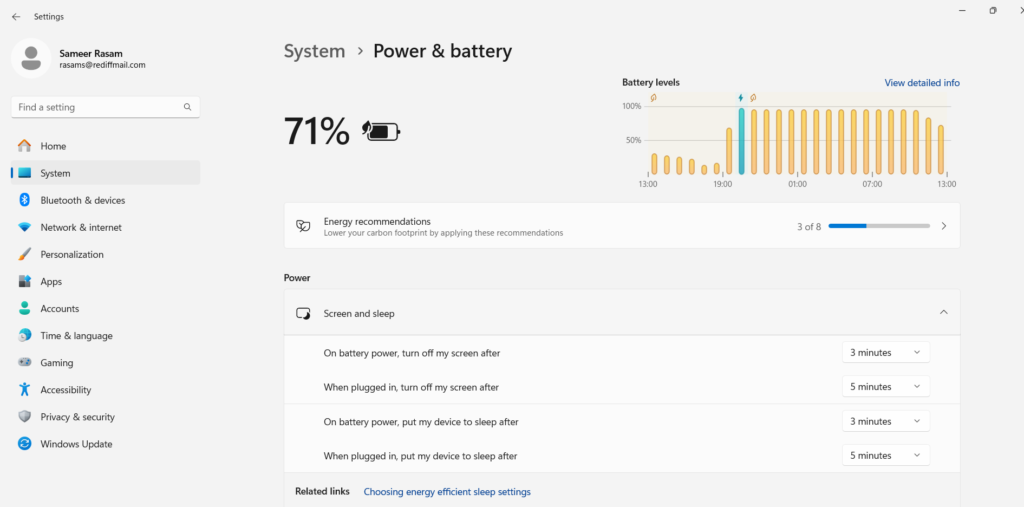
Windows power settings can dictate when the screensaver activates. Ensure that the power settings are configured correctly:
- Press
Win + Sto open the Windows search bar and type “Power & Sleep settings.” - In the “Power & Sleep settings” window, under “Screen,” make sure “When plugged in, PC goes to sleep after” is set to a time that suits your preferences.
- Also, check the “Screen saver settings” link to configure the screensaver wait time and other options.
3. Check for Mouse and Keyboard Activity
The simplest solution to the screensaver not working is to ensure that there’s no mouse or keyboard activity. Follow these steps:
- Check if any external devices (such as a wireless mouse or keyboard) are inadvertently moving or generating input.
- Close any running applications that might be using your mouse or keyboard.
- Ensure your mouse or keyboard is not malfunctioning. Try using a different mouse or keyboard to see if the issue persists.
4. Update Display Drivers
Outdated or corrupted display drivers can lead to screensaver not working problems. To update your display drivers:
- Press the Windows key + R to open the Run box.
- Type devmgmt.msc and click OK to open Device Manager.
- In the Device Manager window, expand the Display adapters section. It will list all the integrated and dedicated graphics drivers installed on your computer. Do the following for all of the drivers.

- Right-click on the display driver and choose Uninstall Driver. Uncheck the “Delete the driver software for this device.” option in the pop-up if it shows up.
- Go to the top menu in Device Manager and under the Action tab, select Scan for hardware changes.
- The driver should appear back in the Display adapters list. If it does not, then restart your PC and it will appear back.
- Right-click on the display driver again and choose Update Driver.
- Select Search automatically for drivers. Windows will scan for available driver updates and download them.
- Restart your PC to apply the changes.
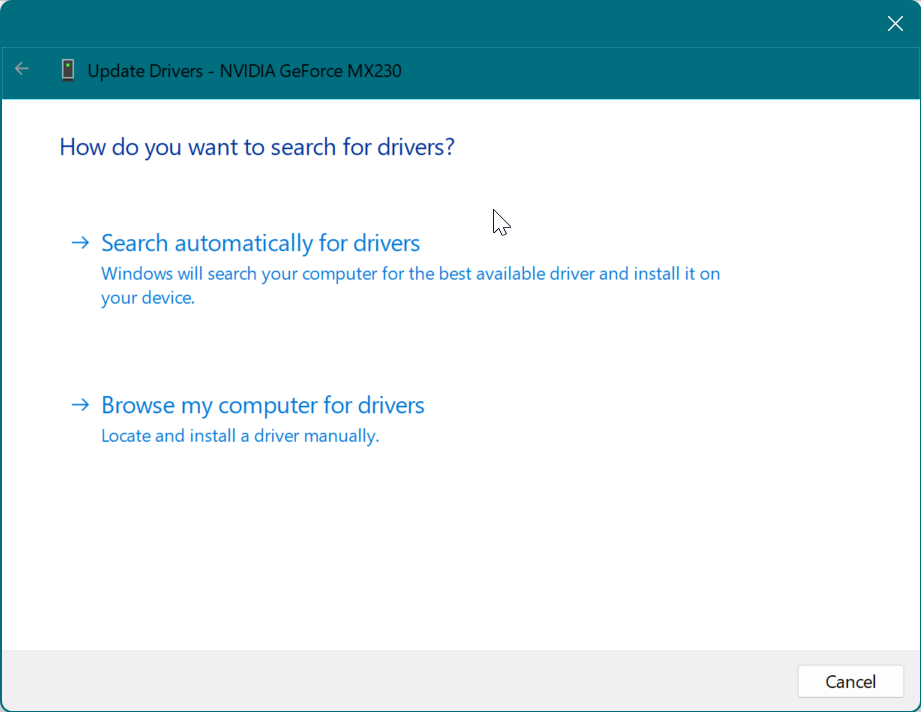
- If it didn’t work, again right-click on the display driver and choose Update Driver but this time select Browse my computer for driver software.
- Then select Let me pick from a list of available drivers on my computer.
- Select the driver you want to install, generally, it is the pre-selected top option in the list and click Next.
- Restart your PC to apply the changes.

- If even that doesn’t work, you can try going to your laptop or graphic card manufacturer’s official website and downloading the latest drivers for your specific model from there and then simply install the drivers and restart your PC to apply the changes.
- The following are links to GPU manufacturer driver download websites:
5. Disconnect External devices
A lot of individuals use additional peripherals, such an Xbox controller, with their laptops. Sometimes the signals from these peripheral devices trick the computer into thinking it is in use, even though the screensaver is supposed to be on. Unplug all unused devices from the computer. One by one, take out each device until you identify the possible source.
6. Check for Windows update
Every operating system update can resolve certain unforeseen computer problems. Try updating your Windows operating system if the options provided above don’t resolve the screensaver not working issue. Restart the computer after that, then double-check.
- Press Win + I to open the Windows Settings.
- Click on Update & Security.
- In the Update & Security window, click on Windows Update in the left-hand menu.
- Click on Check for updates and let Windows search for and install any available updates.
- After the updates are installed, restart your computer and check if the brightness control function keys are functioning correctly.

7. Change Power plan Mode
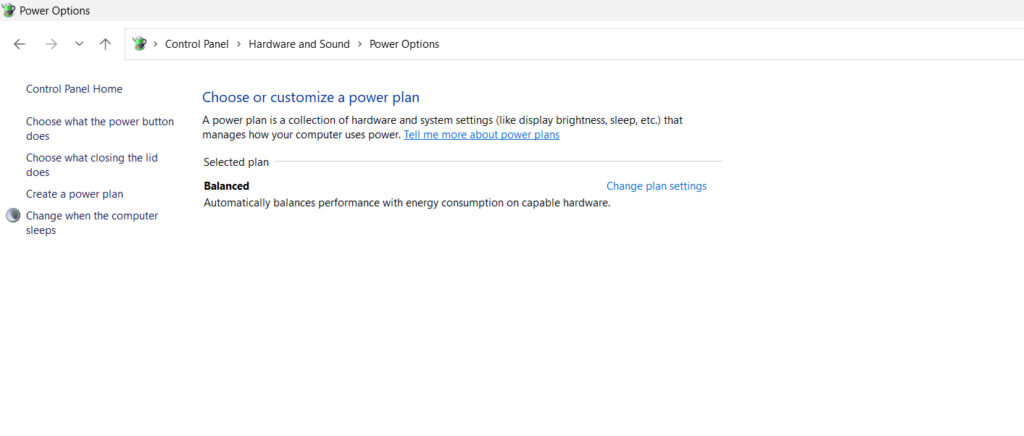
Microsoft warns that employing particular power plans may cause some devices to misbehave and display the “screensaver not working” problem. Change the power plan on your Windows 11 or 10 PC to a balanced or high performance. Although it might temporarily fix the problem, we advise keeping an eye out for updates that can address it. Misconfigured power management settings can lead to the screensaver not working error. To resolve this issue:
- Press the Windows + I keyboard shortcut to launch the Settings app.
- Select System > Power and Battery.
- Next, select either “Balanced” or “Best Performance” from the drop-down menu for the power mode.
8. Disable Background Software
Background software or applications can prevent the screensaver from starting. To identify and disable these programs:
- Press
Ctrl + Shift + EscorCtrl + Alt + Deleteto open the Task Manager. - Go to the “Processes” tab and look for any applications that might be running continuously in the background.
- Select the software that might be causing the issue and click “End Task” to close it.

9. Run Power Troubleshooter
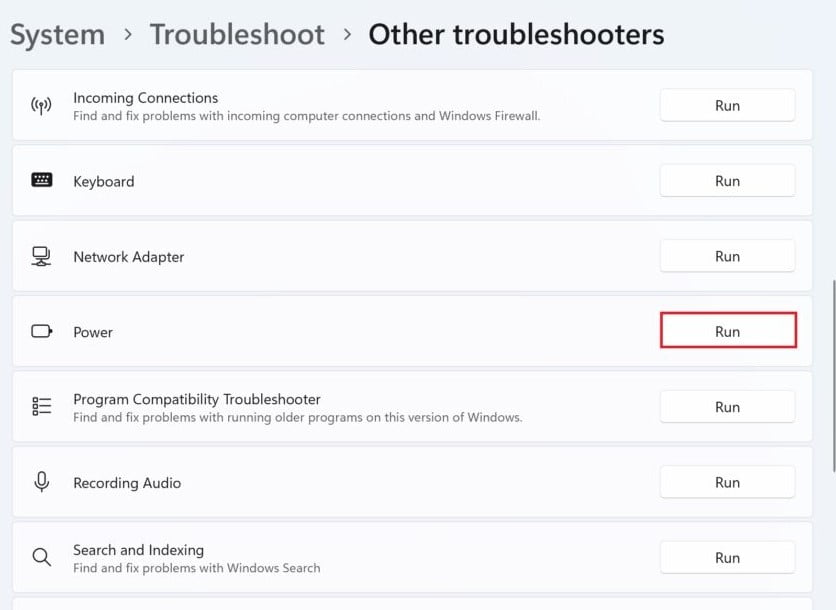
Try Power Troubleshooter if none of the fixes were sufficient for your system to identify the screensaver not working problem. This is an effective troubleshooting tool for users of Windows 10 Creators Update and later versions. Use this option by doing the actions listed below:
- Open Settings, by pressing Windows + I together.
- Select the System tab, and click on the Troubleshoot option.
- Click on Other troubleshooters.
- Click on Run in front of the Power Troubleshooter option.
10. Run the SFC and DISM scan
A System File Check (SFC) scan can help identify and repair corrupted system files that may be causing screensaver not working issues. The DISM is another tool you can try out; while it’s not exactly like SFC, it functions almost identically. A DISM scan locates and corrects any flaws with your system image that might be causing screensaver not working issues with the operation of your PC, much as how the SFC tool aids in PC repair.
- Open Start.
- Search for Command Prompt, right-click the top result, and select the Run as administrator option.
- Type the following commands to perform a quick fix on your PC: sfc /scannow
- Be patient and wait till the scanning is complete.

Conclusion
Having your Windows screensaver not working can be a frustrating experience, but it’s a problem that can often be resolved with a few simple steps. By following the solutions mentioned above, you should be able to identify and fix the issue that’s preventing your screensaver from activating. Whether it’s due to mouse or keyboard activity, background software conflicts, outdated display drivers, power settings, or screen-saver configurations, one of these solutions should help you get your screensaver back on track.
Remember that keeping your system updated, using reliable antivirus software, and periodically checking for driver updates can prevent screensaver issues in the future. With these steps, you can enjoy the benefits of a screensaver that not only enhances the aesthetics of your computer but also serves as a useful feature to protect your monitor from burn-in.


