Table of Contents
Fix: keyboard or mouse stops working
In the world of technology, few things are more frustrating than encountering issues with your computer peripherals. One common problem that Windows users often face is the keyboard or mouse stops working after a system restart. This can be a perplexing situation, leaving users feeling helpless and hindered in their day-to-day tasks. However, fear not! In this comprehensive guide, we will explore the reasons behind the keyboard or mouse stops working issue and provide step-by-step solutions to help you get your keyboard and mouse back in action after a Windows restart.
Understanding the Problem
Before delving into solutions, it’s crucial to understand why your keyboard or mouse stops working after a Windows restart. Several factors could contribute to this keyboard or mouse stops working problem, ranging from driver issues to hardware malfunctions. Here are some common causes:
- Driver Issues:
- Outdated or incompatible drivers can lead to communication breakdowns between your operating system and peripherals.
- Windows updates or installations may sometimes overwrite existing drivers, causing conflicts.
- Hardware Malfunction:
- Faulty USB ports, damaged cables, or malfunctioning hardware components can result in the keyboard or mouse stops working.
- Dust or debris accumulation in ports can also disrupt proper connections.
- Power Management Settings:
- Windows power management settings can interfere with USB devices, causing them to disconnect or become unresponsive after a restart.
How to Fix the keyboard or mouse stops working
Now that we’ve identified potential causes let’s move on to the solutions.
1. Check Physical Connections
Begin by examining the physical aspects of your setup. Ensure that your keyboard and mouse are properly connected to the computer. If you’re using USB peripherals, try plugging them into different USB ports to rule out keyboard or mouse stops working issues with a specific port. Inspect cables for damage and replace them if necessary.
2. Restart Your Computer in Safe Mode
Booting your computer in Safe Mode allows it to start with a minimal set of drivers and services, helping identify if third-party software or drivers are causing the keyboard or mouse stops working problem.
By doing this, the system will only start up with crucial Microsoft services and applications that support proper operation. For instructions on how to boot a Windows 11 computer into safe mode, see the list below:
- Press Win + I together to open Windows Settings.
- Choose System from the left pane and head over to the Recovery section on the right side of the window.

- Click on the Restart Now button associated with Advanced Startup.
- Hit Restart now again.

- Head over to Troubleshoot > Advanced options in the next window.
- Choose Startup Settings and then click on Restart.
- In the following window, press 4 to launch Safe Mode.

- Once the PC boots into Safe Mode successfully, try checking if this fixes the problem.
- Once in Safe Mode, you can perform various troubleshooting tasks, such as running a system scan for errors, uninstalling recently installed software, or updating drivers.
If your keyboard and mouse work fine in Safe Mode, the issue may be related to third-party software or drivers. Proceed to the next step to troubleshoot further.
3. Update or Roll Back Drivers
Outdated or incompatible drivers are common culprits for keyboard or mouse stops working issues. One of the most common reasons for keyboard and mouse issues, including the keyboard or mouse stops working, is outdated or incompatible keyboard and mouse drivers.
Windows 11 relies heavily on processing, and having the latest drivers is crucial for a smooth experience. Follow these steps to update or roll back your drivers:
- Press the Windows key + R to open the Run box.
- Type devmgmt.msc and click OK to open Device Manager.
- In the Device Manager window, expand the Keyboards section.
- Right-click on the Keyboard driver and choose Uninstall Driver. Uncheck the “Delete the driver software for this device.” option in the pop-up if it shows up.

- Go to the top menu in Device Manager and under the Action tab, select Scan for hardware changes.

- The driver should appear back in the Keyboards list. If it does not, then restart your PC and it will appear back.
- Right-click on the keyboard driver again and choose Update Driver.
- Select Search automatically for drivers. Windows will scan for available driver updates and download them.
- Restart your PC to apply the changes.

If updating the drivers doesn’t resolve the keyboard or mouse stops working issue, you can also try rolling back to the previous driver version:
- Right-click on the Keyboard driver.
- Select “Properties” instead of “Update driver.”
- Navigate to the “Driver” tab and click “Roll Back Driver” if the option is available.
4. Check Power Management Settings
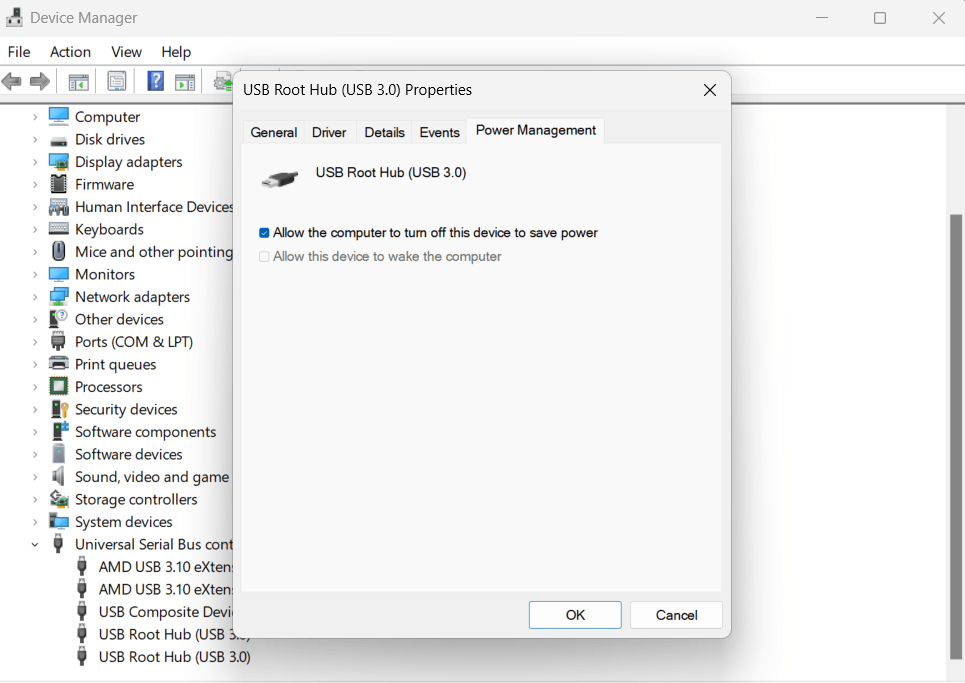
Windows power management settings might be causing your keyboard or mouse to disconnect after a restart. This keyboard or mouse stops working problem can be resolved by adjusting the Power Management Settings for your USB ports. To adjust these settings:
- Right-click on the Start button and select “Device Manager.”
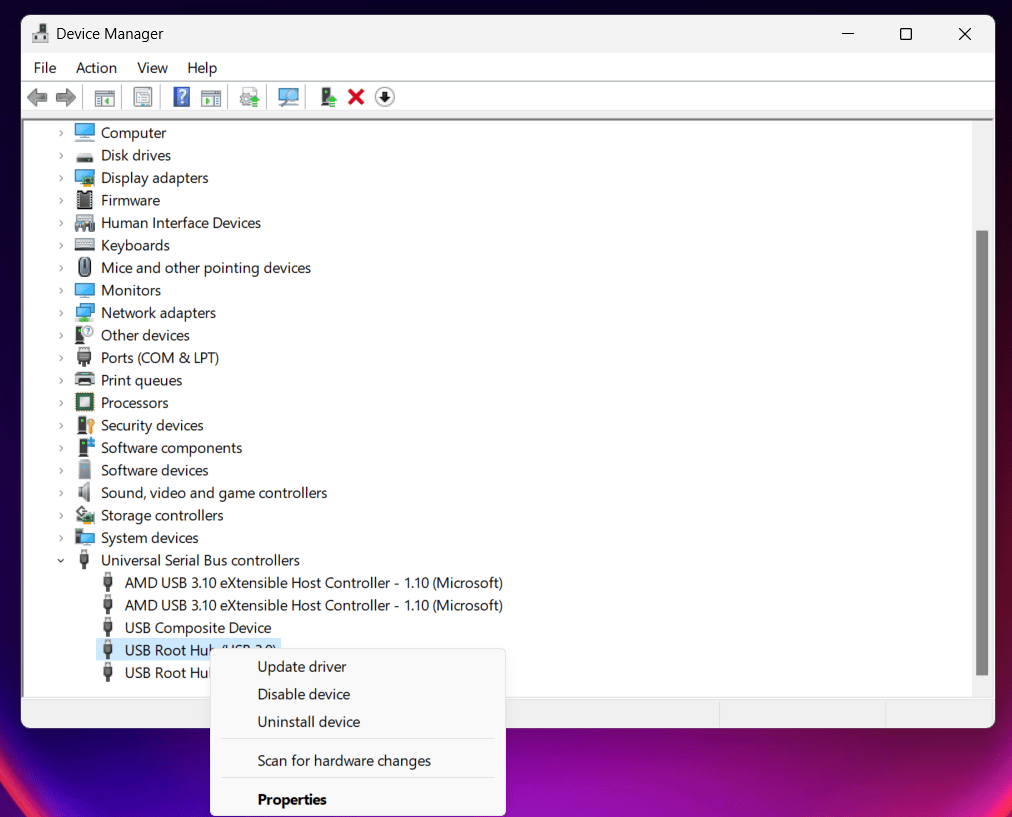
- Navigate to the “Universal Serial Bus Controllers” section.
- Right-click on each “USB Root Hub” entry, go to “Properties,” and click the “Power Management” tab.
- Uncheck the box that says “Allow the computer to turn off this device to save power.”
- Repeat this process for all USB Root Hubs.

5. Perform a System Restore
If the issue started after a recent change or update, performing a system restore can revert your system to a previous state where the keyboard or mouse stops working correctly.
- Press the Windows key + S and type “System Restore” in the search bar.
- Select Create a restore point from the search results.

- Click on System Restore under the “System Protection” tab.

- It will prompt you to select a certain date and open the restoring window.

- If you previously created a restore point, you should utilize it; otherwise, the computer will display a recommended date for restoration. Then click “Finish” to complete the process.
- The finishing time is a few minutes. When finished, your computer will reboot.
6. Check for Windows Updates
Ensuring your operating system is up-to-date is crucial for optimal performance. Windows updates often include fixes for various bugs and keyboard or mouse stops working issues.
Every operating system update can resolve certain unforeseen computer problems. Try updating your Windows operating system if the options provided above don’t resolve the keyboard or mouse stops working issue. Restart the computer after that, then double-check.
- Press Win + I to open the Windows Settings.
- Click on Update & Security.
- In the Update & Security window, click on Windows Update in the left-hand menu.
- Click on Check for updates and let Windows search for and install any available updates.
- After the updates are installed, restart your computer and check if the brightness control function keys are functioning correctly.

7. Test in Another User’s Account
Create a new user account and check if the keyboard or mouse stops working issue persists. If the keyboard or mouse stops working problem is exclusive to your user account, it could be related to user-specific settings or configurations.
- Press Windows Key + I to open Settings.
- Go to “Accounts” and select “Family & other users.”
- Under “Other users,” click “Add someone else to this PC” and follow the prompts.
- Log in to the new account and check if the keyboard and mouse work properly.
8. Perform a System File Check (SFC) Scan
Corrupted system files can lead to keyboard or mouse stops working issues, including problems with peripherals. Running an SFC scan can help identify and repair these files.
- Open Start.
- Search for Command Prompt, right-click the top result, and select the Run as administrator option.
- Type the following commands to perform a quick fix on your PC: sfc /scannow
- Be patient and wait till the scanning is complete.

9. Reinstall USB Controllers
Corrupted USB controllers can be the root cause of keyboard or mouse stops working issues. Usually, this problem is caused by your keyboard or mouse drivers. The Device Manager allows you to uninstall and then reinstall them. The USB port driver can potentially be connected to the keyboard or mouse stops working issue. Reinstalling the USB controller drivers can be helpful in this situation. To reinstall them:
- Right-click on the Start button and select “Device Manager.”
- Expand the “Universal Serial Bus Controllers” section.
- Right-click on each “USB Root Hub” entry and choose “Uninstall device.”
- Restart your computer.

10. Reset BIOS to defaults
The BIOS or UEFI firmware on your motherboard controls the hardware components and their interactions with the operating system. An outdated or buggy BIOS/UEFI version can lead to keyboard or mouse stops working issues and Driver Power State Failure BSOD errors. To update your BIOS/UEFI:
- Visit your motherboard manufacturer’s website and download the latest BIOS/UEFI update for your specific model.
- Follow the manufacturer’s instructions to update your BIOS/UEFI. Be cautious during this process, as incorrect updates can potentially damage your motherboard.
Conclusion
By following these comprehensive steps, you should be able to troubleshoot and resolve the keyboard or mouse stops working issue of your keyboard or mouse not working after restarting Windows. Remember to approach each step carefully and methodically, and if the keyboard or mouse stops working problem persists, it may be worth seeking assistance from professional support or forums dedicated to Windows troubleshooting. With a bit of patience and perseverance, you can regain control of your peripherals and get back to using your computer without interrup tions.


