Encountering error 0x80070002 while updating Windows 11 can be frustrating. This error typically occurs due to corrupted files or issues with the update process. Here’s a comprehensive guide to resolve this error:
Table of Contents
1. Remove Any Unnecessary Peripherals and Reboot
Disconnect external devices such as USB drives, printers, or hard drives. Reboot your computer to see if the error persists.
2. Check Time Settings
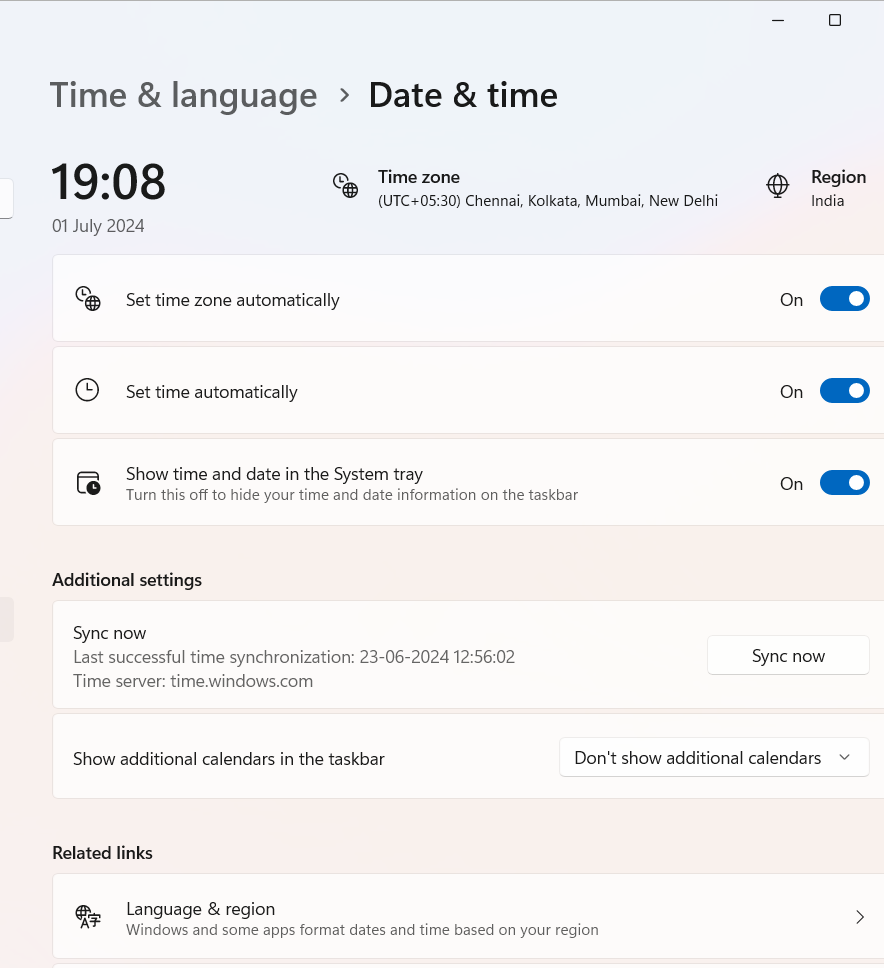
The incorrect date and time can interfere with the Windows Update- 0x80070002 error process, even though it may not seem conceivable. Ensure your system’s date and time settings are correct:
- Go to Settings > Time & Language > Date & Time.
- Toggle Set time automatically and Set time zone automatically.
3. Run the Windows Update troubleshooter
Windows provides a built-in troubleshooter to fix 0x80070002 issues:
- Open Settings by searching on Windows Search for Settings.
- Choose Troubleshoot under the System tab.
- Click on Other troubleshooters.
- Click on Run next to Windows Update.
- The update troubleshooter will pop up and look for any available issues.
- Follow the on-screen instructions to remove the detected problems from the system.

4. Check drivers
Ensure that your device drivers are up-to-date, especially graphics and chipset drivers. Visit the Dell website to download the latest drivers for your specific model. Ensure all your drivers are up to date:
- Go to Device Manager.
- Right-click on each device and select Update driver.

5. Clean temporary files
Clearing the File Explorer crashes history can help in case it’s causing conflicts. When this data becomes old or faulty, it can cause 0x80070002 issues, including the one detailed here.
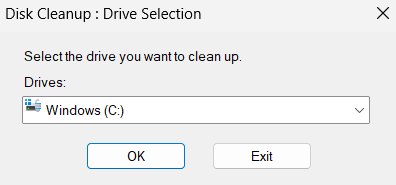
- In the search box, type Disk Cleanup by pressing Win + S.
- Choose the most appropriate option to initiate Disk Cleanup.
- From the drop-down list, select the desired drive.
- To delete files, choose them from the Files to delete column and click OK.
6. Check power
Ensure your device is connected to a stable power source during updates to avoid interruptions.
7. Reset Windows Update Components
The Software Distribution folder stores temporary files related to Windows updates. Corrupted files in this folder can lead to “error 0x80070002” issues. Clearing this folder may resolve the problem.
Resetting Windows Update components can fix installation error 0x800f081f:
- Open Command Prompt as an administrator.
- Run the following commands one by one:
- net stop wuauserv
- net stop cryptSvc
- net stop bits
- net stop msiserver
- ren C:\Windows\SoftwareDistribution SoftwareDistribution.old
- ren C:\Windows\System32\catroot2 catroot2.old
- net start wuauserv
- net start cryptSvc
- net start bits
- net start msiserver
8. Modify Registry Entry
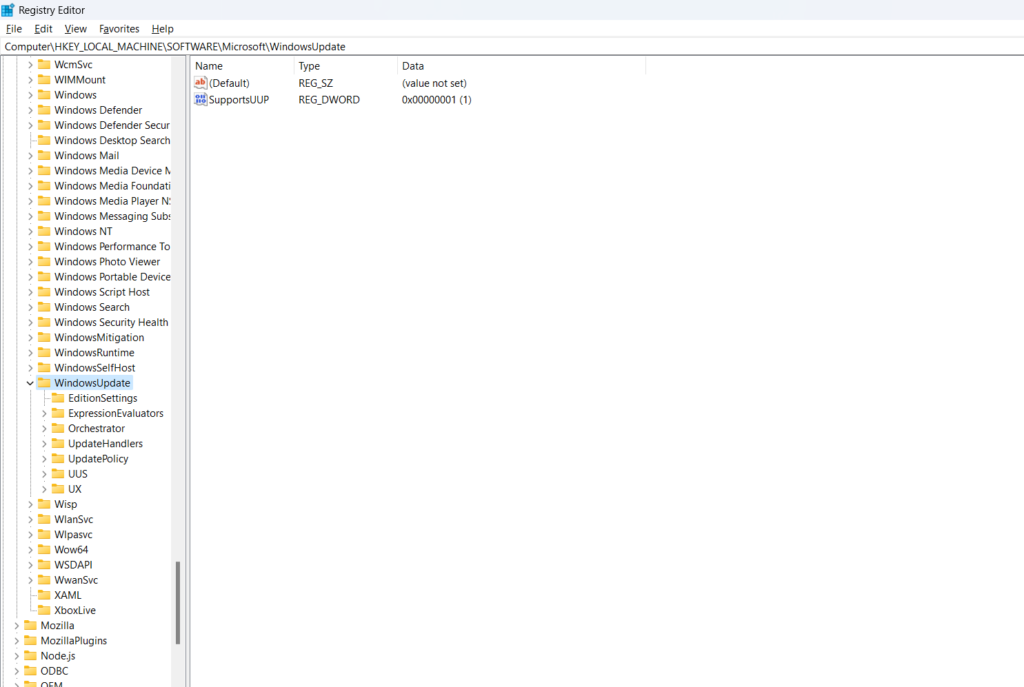
Besides running the Windows update troubleshooter, you can also modify the registry editor to fix this 0x80070002 error.
- Press Win + R, type
regedit, and press Enter. - Navigate to:
HKEY_LOCAL_MACHINE\SOFTWARE\Microsoft\Windows\CurrentVersion\WindowsUpdate - Delete any OSUpgrade entries.
- Right-click on the new created “New Value#1” and click on Modify.
- Now change the value name to AllowOSUpgrade and type 1 on the value data. Then choose Hexadecimal and click on OK.
9. Restart the Windows Update Service
Restarting the Windows Update service can resolve many 0x80070002 error issues:
- Press
Win + R, typeservices.msc, and press Enter. - Scroll down to find “Windows Update“.
- Right-click on it and select “Restart“.
- If the service is not running, click Start first and then Restart.

10. Run DISM and System File Checker
Corrupted system files can cause installation errors 0x80070002. A System File Check (SFC) scan can help identify and repair corrupted system files that may be causing “0x80070002” issues. The DISM is another tool you can try out; while it’s not exactly like SFC, it functions almost identically.:
- Open Start.
- Search for Command Prompt, right-click the top result, and select the Run as administrator option.
- Type the following commands to perform a quick fix on your PC.
DISM /Online /Cleanup-Image /CheckHealth
DISM /Online /Cleanup-Image /ScanHealth
DISM /Online /Cleanup-Image /RestoreHealth
SFC /scannow- The DISM and SFC commands are used for scanning your PC and automatically installing broken or missing Windows files on your PC.
- Type the following commands to perform a quick fix on your PC: sfc /scannow
- Be patient and wait till the scanning is complete.

11. Uninstall Recent Updates
If you are experiencing issues after installing an update, consider checking for solutions or waiting for Microsoft to release a fix for the 0x80070002 problem.
- Go to the Windows Settings.
- Click “Windows Update” from the left-hand side menu.
- Then go to the Update history > Uninstall Updates.

12. Run A Windows Defender Scan for Malware
Malware and viruses can cause 0x80070002 errors. To check for issues, conduct a complete computer scan using an authorized antivirus or antimalware tool. Make sure your antivirus software is up to date. You can download a free Malware detector tool.
- Type “Windows Security” in the Windows search bar and select “Windows Security” from the results.
- In the Windows Security window, click on “Virus & Threat Protection.“
- Under “Current threats,” click on “Quick Scan” to perform a basic scan.
- For a more comprehensive scan, you can choose “Full Scan.“
- Follow the on-screen instructions to complete the scan.
- If any threats are detected, Windows Defender will provide options to remove or quarantine them.

13. Reset this PC
If none of the above solutions resolve the “0x80070002” issue and Windows Security still refuses to open, you can consider performing a Windows reset. This will reinstall Windows 11 while keeping your files and settings intact.
- Press the Windows key + I to open Windows “Settings.”
- Click “System” from the left-hand side menu.
- Scroll down and, select the “Recovery” option.
- Under Recovery click on the “Reset PC.“

- Choose from Keep my Files and Remove everything. Then follow the guidelines on the screen to complete the resetting process.

14. Windows 11 installation assistant
Download and run the Windows 11 Installation Assistant from the Microsoft website to manually update your system.
15. Check for Sufficient Disk Space
The 0x80070002 problem with Windows 11 may occur if there are any mistakes on your hard disk. You may check the file system and resolve some issues with specific settings by running CHKDSK on the command prompt.
- Open Start.
- Search for Command Prompt, right-click the top result, and select the Run as administrator option.
- Type “chkdsk /f C:” and press Enter (replace “C:” with the letter of the drive you want to check if it is not your system drive.)
- Press “Y” when prompted to schedule the disk check on the next restart.
- Restart your PC.

- The disk check will run automatically on startup and check for any issues with the disk.
- If any issues are found, they will be fixed automatically.
16. Perform a Clean Boot
By doing a clean boot, the 0x80070002 problem in Windows 11 can be fixed. By doing this, you will be able to identify precisely which service is responsible for your computer’s 0x80070002 problem. Here is the procedure for doing this in detail.
- Press the Windows key + R to open the Run dialog box.
- Type “msconfig” and press Enter to open the System Configuration.
- In the System Configuration window, go to the “Services” tab.
- Check the box that says “Hide all Microsoft services.“
- Click the “Disable all” button.

- Next, go to the “Startup” tab and click on “Open Task Manager.“
- In the Task Manager window, disable all the startup programs by right-clicking on each entry and selecting “Disable.”

- Close the Task Manager and go back to the System Configuration window.
- Click “OK” and then restart your computer.
17. Temporarily Disable Antivirus/FirewallCheck Device Drivers
Temporarily disable your antivirus or firewall and try updating again. Remember to re-enable it afterward.
- Press the Win key to open the Start Menu.
- Type Windows Security and press Enter.
- Choose Firewall & network protection from the left panel.
- Choose the Private network option.
- Disable the toggle under Microsoft Defender Firewall.
- If UAC pops up, click on Yes.
- Check if the problem continues. If yes, just enable the Firewall again.

18. Manually Download and Install the Update
If the update fails via Windows Update, download and install it manually:
- Go to the Microsoft Update Catalog.
- Search for the specific updated KB number and download it.
- Run the downloaded file to install the update.
19. Disable third-party Anti-Virus program
Disable any third-party antivirus software temporarily and attempt the update again.
- Right-click on the Start button.
- Select Installed Apps from the menu.
- Locate your third-party security software in the list.
- Click on it and select Uninstall.

20. Turn Off the Proxy Connection
Incorrect proxy settings can affect internet access.
- Go to Settings > Network & Internet > Proxy.
- Ensure “Use a proxy server” is turned off.

21. Reset Winsock
Resetting Winsock (Windows Sockets) fixes any network-related issues that may be preventing the update from installing and fixes the Windows Update install error 0x800700002.
- Open Command Prompt as an administrator.
- Run: netsh winsock reset
22. Re-register DLLs Integral to Windows Update
The Windows update and installation procedure depends on a few DLLs. You might need to use the regsvr32 command to re-register them if you experience the install error 0x80070002. The actions listed below are what you should do.
- Open Command Prompt as an administrator.
- Run the following commands one by one:
- regsvr32 atl.dll
- regsvr32 urlmon.dll
- regsvr32 mshtml.dll
23. Repair Your Windows 10 Installation
Repairing your Windows installation can resolve install error 0x80070002 issues.
- Insert your Windows 10 installation media or create a bootable USB drive.
- Boot from the installation media.
- Select “Repair your computer” and follow the on-screen instructions.
24. Boot into Safe Mode
If your Windows 11 computer is still stuck in the 0x80070002 error, a third-party app might be to blame. As a result, we advise that you start the computer in Safe mode.
- Press Win + I together to open Windows Settings.
- Choose System from the left pane and head over to the Recovery section on the right side of the window.

- Click on the Restart Now button associated with Advanced Startup.
- Hit Restart now again.

- Head over to Troubleshoot > Advanced options in the next window.
- Choose Startup Settings and then click on Restart.
- In the following window, press 4 to launch Safe Mode.

- Once the PC boots into Safe Mode successfully, try checking if this fixes the problem.
- Once in Safe Mode, you can perform various troubleshooting tasks, such as running a system scan for errors, uninstalling recently installed software, or updating drivers.


