Experiencing issues with your camera on Windows 11 can be frustrating, especially when you need it for video calls or important meetings. This guide provides step-by-step solutions to help you resolve “camera not working” issues on your Windows 11 device.
Table of Contents
1. Restart your device
Sometimes, a simple restart can resolve “camera not working” issues. Restart your computer to refresh the system and check if the camera starts working.
2. Check if there’s a physical switch
For privacy reasons, many laptops have a physical switch or button on the keyboard to disable the camera. Ensure that this switch is turned on. Check for function keys maybe the f6 or f9 key with a camera symbol on it. This will enable and disable your camera. You may need to press the function key fn along with the camera key on the keyboard.
3. Try a different USB port
The USB port might be an issue if you use an external camera. Connect the camera to a different USB port to rule out port-related problems.
4. Turn on camera Usage for All Apps
In applications like Zoom or Skype, select the correct camera. Sometimes, the wrong device might be chosen by default.
5. Enable the camera
If the camera is not enabled, it causes a “camera not working” issue. Check if your camera is enabled in the Device Manager:
- Go to Start.
- Type “manage cameras”, and select the camera to enable.

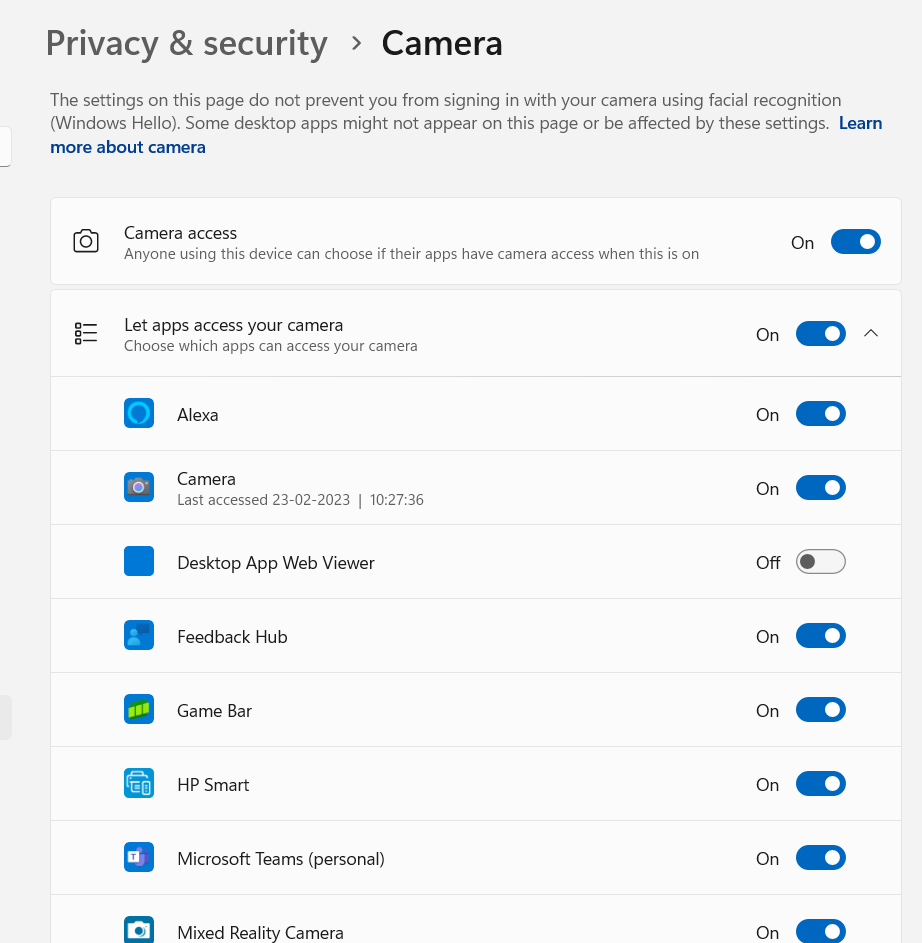
6. Check Camera Privacy Settings
Ensure that your applications have permission to use the camera:
- Go to
Settings>Privacy & security>Camera. - Toggle the switch to allow apps to access your camera.
- Scroll down and ensure the individual app permissions are enabled.
7. Update Camera drivers
Outdated or corrupted drivers can cause “camera not working” issues:
- Press
Win + Xand selectDevice Manager. - Expand the
Camerassection. - Right-click your camera and select
Update driver. - Choose
Search automatically for drivers.

8. Roll-back Camera driver
If the camera not working after a recent update, rolling back the driver might help:
- Open
Device Manager. - Right-click your camera and select
Properties. - Go to the
Drivertab and clickRoll Back Driver.

9. Run Camera Troubleshooter
Windows 11 has a built-in troubleshooter that can detect and fix “camera not working” issues:
- Go to
Settings>System>Troubleshoot. - Select
Other troubleshooters. - Find and run the
Cameratroubleshooter.

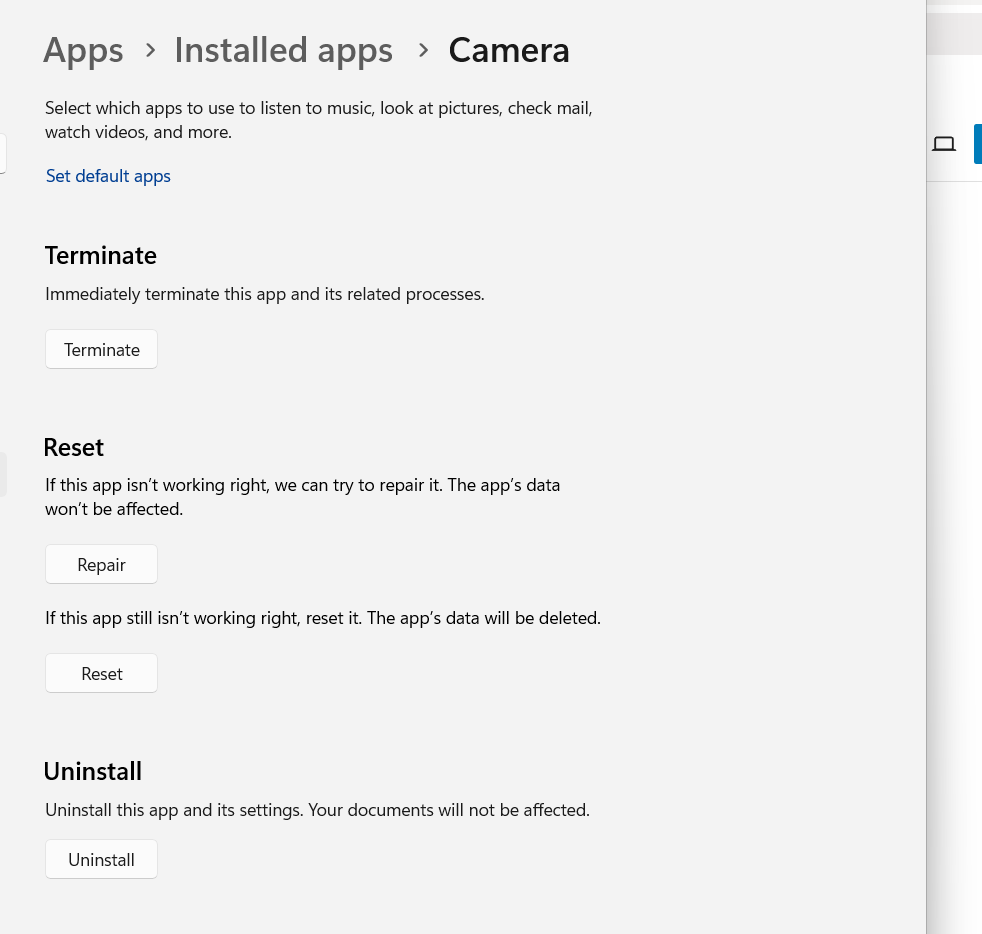
10. Reset the Camera App
Resetting the camera app can fix “camera not working” issues related to app settings:
- Go to
Settings>Apps>Apps & features. - Find and select the Camera app.
- Click
Advanced optionsand thenReset.
11. Switch to UVC driver
Switching to a generic driver can sometimes resolve “camera not working” issues:
- Open
Device Manager. - Right-click your camera and select
Update driver. - Choose
Browse my computer for drivers. - Select
Let me pick from a list of available drivers on my computer. - Choose
USB Video Device.

12. Check for Windows updates
Every operating system update can resolve certain unforeseen computer problems. Try updating your Windows operating system if the above options don’t fix the”camera not working” issue. Restart the computer after that, then double-check.
- Press Win + I to open the Windows Settings.
- Click on Update & Security.
- In the Update & Security window, click on Windows Update in the left-hand menu.
- Click on Check for updates and let Windows search for and install any available updates.
- After the updates are installed, restart your computer and check if the brightness control function keys are functioning correctly.

13. Scan for hardware changes
Ensure that your system recognizes all hardware changes:
- Open
Device Manager. - Right-click on your computer’s name and select
Scan for hardware changes.

14. Run a malware scan
Malware can cause a “camera not working” issue. Run a full system scan using Windows Defender or your preferred antivirus software.
- Type “Windows Security” in the Windows search bar and select “Windows Security” from the results.
- In the Windows Security window, click on “Virus & Threat Protection.“
- Under “Current threats,” click on “Quick Scan” to perform a basic scan.
- For a more comprehensive scan, you can choose “Full Scan.“
- Follow the on-screen instructions to complete the scan.
- If any threats are detected, Windows Defender will provide options to remove or quarantine them.

15. Temporarily disable your antivirus software
Sometimes, antivirus software can interfere with the camera. Temporarily disable your antivirus software to check if it resolves the “camera not working” issue.
- Press the Win key to open the Start Menu.
- Type Windows Security and press Enter.
- Choose Firewall & network protection from the left panel.
- Choose the Private network option.
- Disable the toggle under Microsoft Defender Firewall.
- If UAC pops up, click on Yes.
- Check if the problem continues. If yes, just enable the Firewall again.

16. Perform System Restore
If the camera worked previously, restoring your system to an earlier state might fix the “camera not working” issue:
- Press the Windows key + S and type “System Restore” in the search bar.
- Select Create a restore point from the search results.

- Click on System Restore under the “System Protection” tab.

- It will prompt you to select a certain date and open the restoring window.

- If you previously created a restore point, you should utilize it; otherwise, the computer will display a recommended date for restoration. Then click “Finish” to complete the process.
- The finishing time is a few minutes. When finished, your computer will reboot.
17. Reset the system
If none of the above solutions resolve the “camera not working” issue and Windows Security still refuses to open, you can consider performing a Windows reset. This will reinstall Windows 11 while keeping your files and settings intact.
- Press the Windows key + I to open Windows “Settings.”
- Click “System” from the left-hand side menu.
- Scroll down and, select the “Recovery” option.
- Under Recovery click on the “Reset PC.“

- Choose from Keep my Files and Remove everything. Then follow the guidelines on the screen to complete the resetting process.

18. Reinstall software
If the “camera not working” issue is specific to a particular app, reinstalling that app might help:
- Restart your computer after inserting the installation disk.
- When the computer boots into BIOS, press a certain key (often F2 or F11) to change the boot order so that your computer boots from the installation disk.
- When the page has loaded, click Install now, and then proceed as directed to finish the procedure.

19. Run SFC and DISM Scan
A System File Check (SFC) scan can help identify and repair corrupted system files that may be causing “camera not working” issues. The DISM is another tool you can try out; while it’s not exactly like SFC, it functions almost identically.
- Open Start.
- Search for Command Prompt, right-click the top result, and select the Run as administrator option.
- Type the following commands to perform a quick fix on your PC.
DISM /Online /Cleanup-Image /CheckHealth
DISM /Online /Cleanup-Image /ScanHealth
DISM /Online /Cleanup-Image /RestoreHealth
SFC /scannow- The DISM and SFC commands are used for scanning your PC and automatically installing broken or missing Windows files on your PC.
- Type the following commands to perform a quick fix on your PC: sfc /scannow
- Be patient and wait till the scanning is complete.

20. Uninstall Camera
To uninstall the camera on your Windows 11 PC, follow these steps:
- Press
Win + Xto open the Power User menu. - Select
Device Managerfrom the list. - In Device Manager, expand the
Camerascategory. - You should see your camera listed there (e.g., Integrated Camera, USB Camera, etc.).
- Right-click on your camera device.
- Select
Uninstall devicefrom the context menu. A confirmation dialog will appear. - Do not check the box Delete the driver software for this device if you also want to remove the driver. Click
Uninstallto confirm.


